


How to Get the Most Out of The Hub
With The Hub, you can easily manage, monitor, scan, access, and maintain unlimited WordPress sites — all in one place! Everything you need for security, performance, SEO, white labeling, and streamlined site management is available in just a few clicks.
This article shows you how to get the most out of The Hub and how to use it to its full potential. As you’ll see, there’s a TON you can do.
We’ll be covering how to:
- Manage Your Plugins & Themes
- Keep Tabs on Your Sites’ Security
- Set Your Site Up for Maximum Performance
- View Your Site’s Insights (in detail)
- Easily Manage Your SEO
- Customize White Label Reports
- Create Filters and Labels
- Make Advanced White Labels
- Access and Take Control of Backups
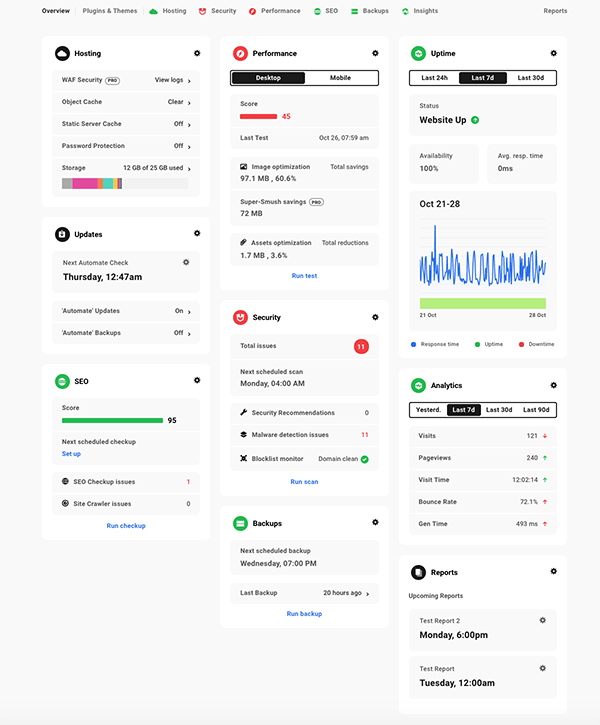
All of these features can be accessed from the tabs above The Hub Overview screen.
You’ll need to have your site connected to The Hub first. If you need help with this, please see how to add a site here.
Once you have your sites connected, you can enable the SSO (Single Sign-On). This is so you can securely access your sites from The Hub without having to sign in separately for each one.
Check out this quick video or documentation to see how easy it is to set up SSO.
Now that we have the foundation for getting started with The Hub set, let’s go through each of these sections:
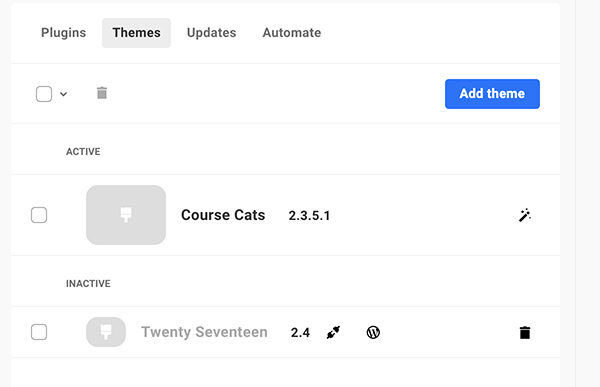
1. Manage Your Plugins & Themes
All your site’s plugins and themes can be managed, viewed, updated, activated & deactivated, deleted, and starred as a favorite from the Plugins & Themes tab.
Plus, you can add plugins & themes and keep everything updated automatically with Automate’s help. Automate is our automatic update WordPress manager.

From here, see all of the active and inactive plugins you have from the Plugins tab. They’re arranged by Core, Active, and Inactive plugins. It also shows what version of each plugin you currently have.
Every plugin you have is listed in this area.
You can bulk activate, deactivate, mark as a favorite, or delete. Or, you can do the same functions on individual plugins.
Same time and do things in bulk.
And if you’d like to add a plugin, you can do so with a click of a button.

The Themes tab will show you what themes you have available for your WordPress site by Active and Inactive. Delete themes from here and also add a new one by clicking Add Theme. It also shows what versions of the themes you have.
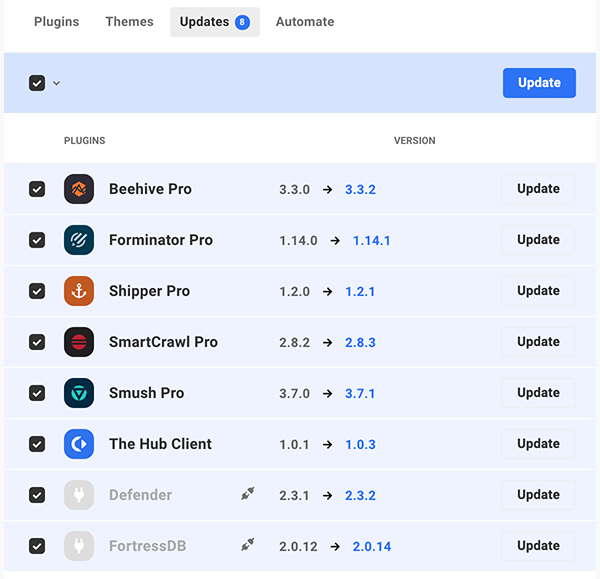
Check for updates in the Updates tab.
It will show you all of the plugins that need to be updated and the version that it will update to. You can update all of them in bulk or individually. It will even give you the option to update plugins that aren’t activated.
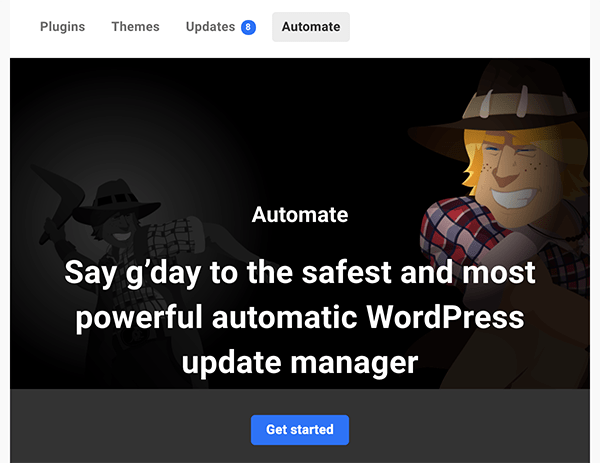
If you’re not fond of manual updates, you can set up Automate to do all of the updating for you from the Automate tab.
It’s quick and easy to get started using automatic updates. If you’re initially getting it set up, Automate walks you through the process.
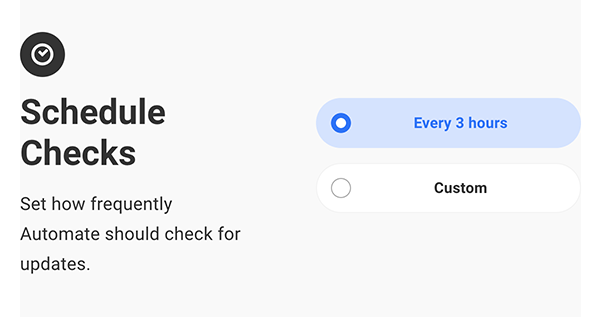
After clicking Get Started, he’ll ask if you’re keen on updating manually or if you want to auto-update all. Then, you can customize how frequently you want Automate to check for updates or choose the every three hours option.
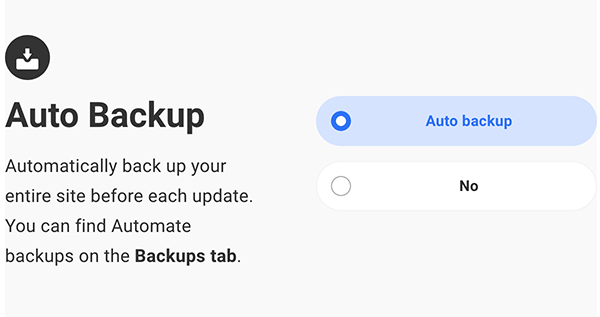
Not only that, you can pick the option to backup your entire site before each update with Auto Backup. Auto backups will ensure your site stays in good shape in case any mishaps happen after an update.
Then, you can choose to have a Safe Update Check. This will tell you if your site is down and show you any visual changes on your pages that you select. You can decide to have this for your homepage, up to five custom pages, or not to do this at all.
Choose if you’d like the safe update feature or not.
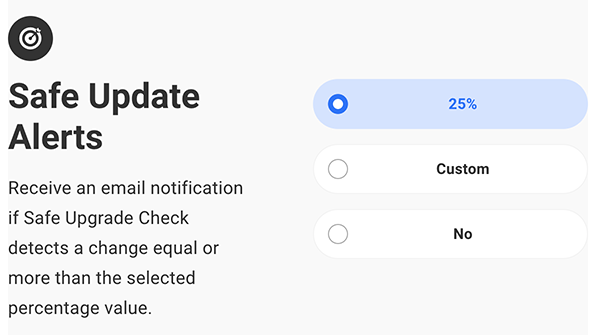
You’ll also get an option for Safe Update Alerts, where you’ll get an email sent to you if there’s a specific percentage change.
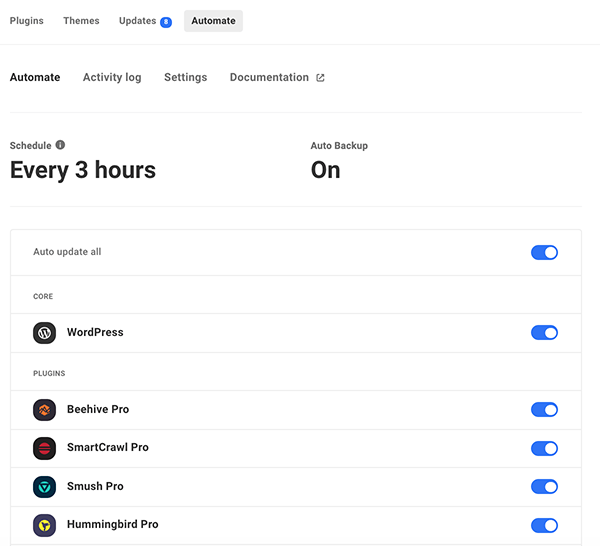
Once Automate’s all set up, it will show you the schedule of when updates occur, if the auto backup is on, and all of your plugins that are updated.
You can turn off an update on specific plugins and change the frequency of updates at any time from the Settings tab.
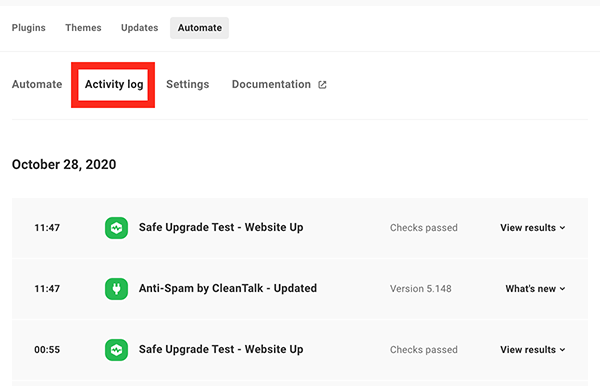
From the Activity Log, you can see up-to-date updates. Plus, you can view results in detail with the dropdown in each specific area.
As you can see, keeping your plugins and themes updated and in good shape is as simple as it gets in The Hub.
For more information on Automate and Plugins & Themes, be sure to check out our documentation.
2. Keep Tabs on Your Sites’ Security
Access to your WordPress site’s security has never been as accessible and simple to monitor thanks to The Hub’s Security area. From it, you can check security issues, run reports, view audit logs, and maintain other features to keep your site secure.
It works in collaboration with Defender. He’s our answer to protect against hackers, brute force attacks, and malicious bots. Once Defender is installed on your site, all security precautions are accessible through The Hub.
Access the security area by clicking on Security in The Hub overview or from the Security tab.
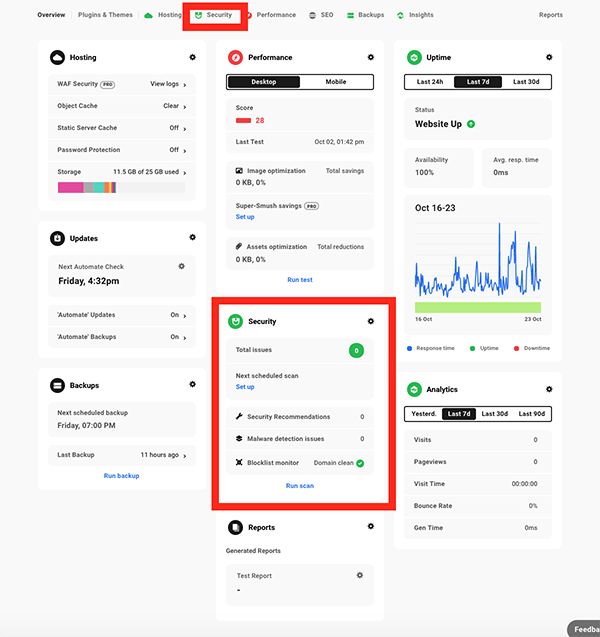
Click on Security and you’ll get a 360 view of all of the security features categorized by individual sections.

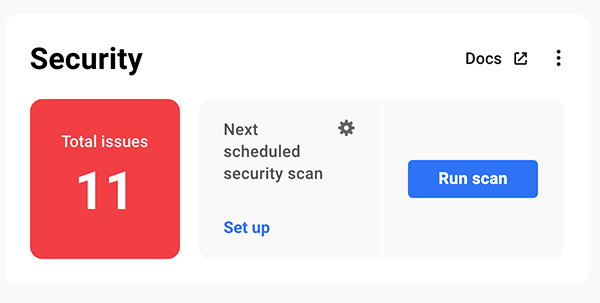
The Security section shows you the total number of security issues and when the next scheduled scan is set to run. You can also set up a scheduled scan and run one instantly.
In the Firewall tab, you can protect your login area and have any suspicious activity locked out.
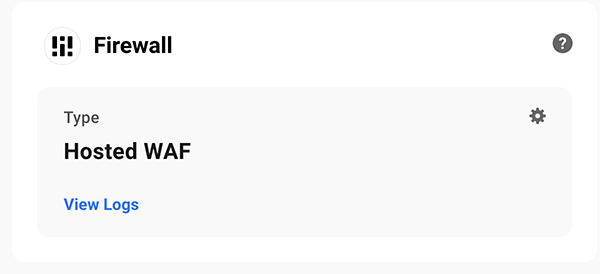
WAF is the first layer of protection that blocks hackers and bot attacks before they even get close to your site. The Firewall section shows you what type of firewall protection you have.
Here, you can also enter IPs in the Allowlist, Blocklist, User Agent Allowlist, User Agent Blocklist, URL Allowlist, and Disabled Rule Ids.
With one-click, your security gets beefed-up.
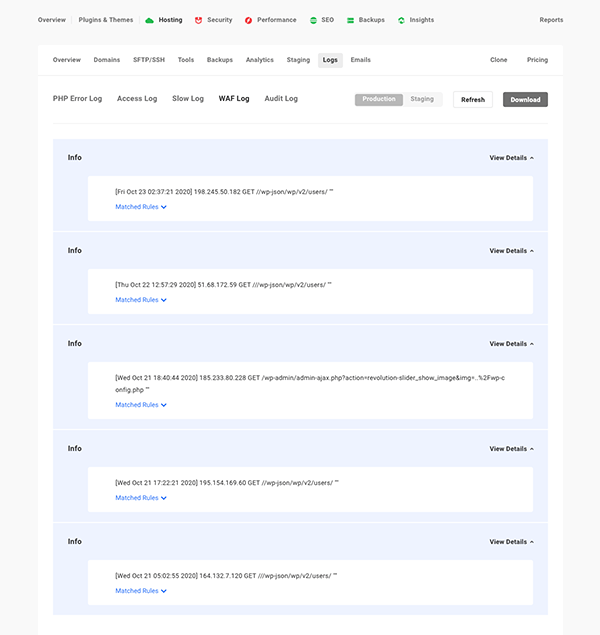
Click on View Logs to instantly view your WAF logs directly in The Hub.
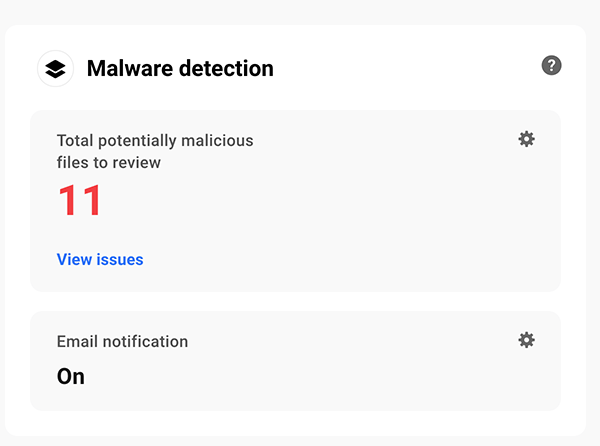
You’ll instantly see how many potentially malicious files there are to review in the Malware Detection area. Access them by clicking View Issues.
Also, enable and set up Email Notifications for when Defender has finished Malware scans.
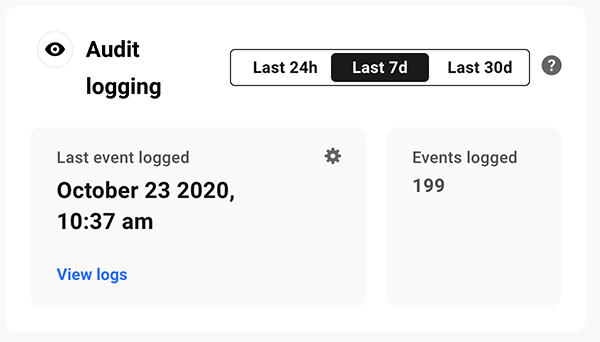
With the Audit Logging area, track, and log events when changes are made to your website. You can view the last 24 hours, seven days, or 30 days. It also shows you when the previous event and the number of events were logged.
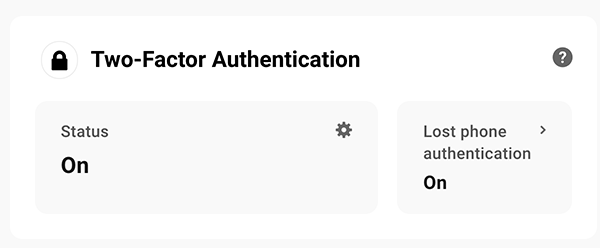
Add an extra boost of security to your login area with Two-Factor Authentication. The Hub will show you the status of it (whether it’s on or off). You can also turn on the Lost Phone Authentication from this area.
To keep tabs on what’s happening with your security, you can set up tailored security reports, so you don’t even need to check The Hub. Set it up in the Your Reports area. They’ll be delivered right to your inbox.
Set up reports for Malware Detection, Firewall, and Audit Logging — all a few clicks away!
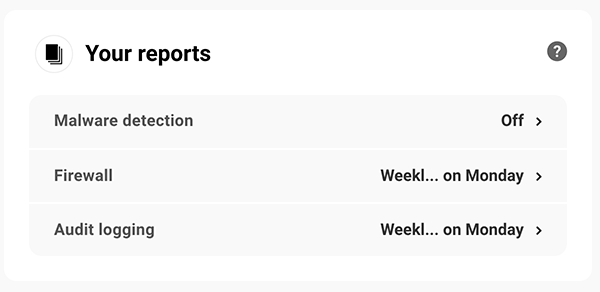
With the reports, you can change the date, time of day, and frequency of reports at any time.
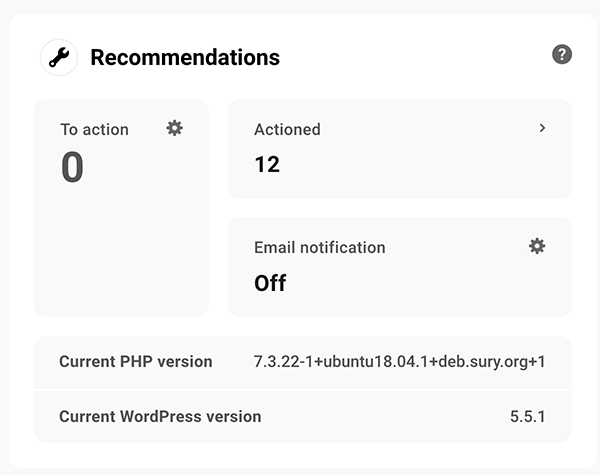
The Recommendations area will show you security tweaks that you can make to enhance your security against hackers and bots trying to break in.
They are organized by Action (recommended tweaks) and Actioned (already taken care of tweaks). You can also set up email notifications when recommendations occur.
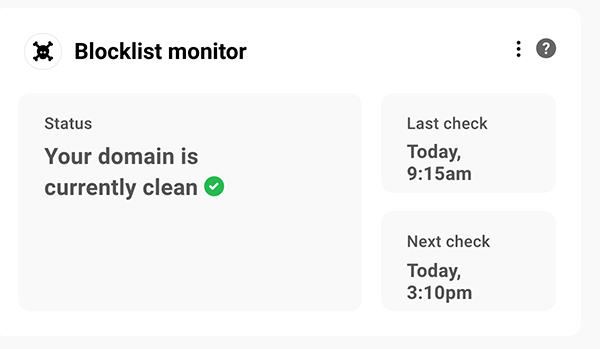
With Blocklist Monitor, automatically check to see if you’re on Google’s blocklist monitor. It examines this for your WordPress site every six hours. If you do happen to end up on the blacklist, we’ll automatically send you an email.
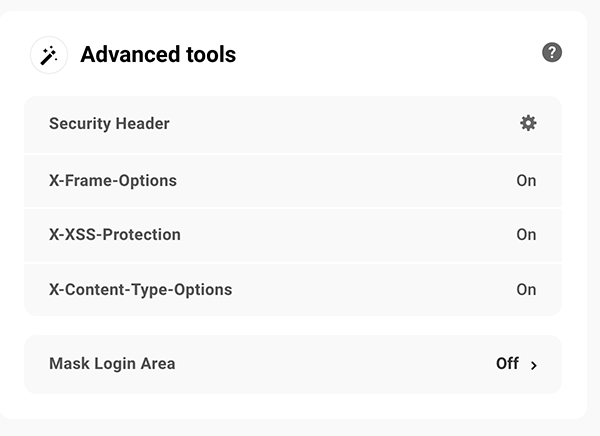
For even more enhanced protection against the most aggressive hackers and bots, there are Advanced Tools, such as X-Frame-Options, X-XSS-Protection, X-Content-Type-Options, and Mask Login Area. They can be enabled in just a few clicks.
Getting the most out of your security is all done from The Hub. Hackers up to no good, and bots don’t stand a chance. And often, they’re stopped in their tracks before even getting close to your site.
For detailed information, be sure to read our article, Securing Your WordPress Site with Defender and The Hub.
3. Set Your Site Up for Maximum Performance
Optimizing your site for speed can seem challenging, but thanks to our powerful plugins, Hummingbird and Smush – it’s easier than ever to monitor and enhance your site’s speed from The Hub.
Hummingbird delivers quicker loading pages by using an easy-to-use interface and one-click automated optimization features. You can have complete control of your site’s optimization with advanced settings & options, technical recommendations, simple to understand score metrics, continuous monitoring of performance issues, and more.
Smush will bulk optimize every image on your site with one-click. Smush fixes Google PageSpeed with the best image optimizer WordPress has ever known.
These two plugins, combined with The Hub, make keeping tabs and optimizing your site’s performance a breeze.
All of this is accessed in the Performance tab or the Performance section in The Hub overview.
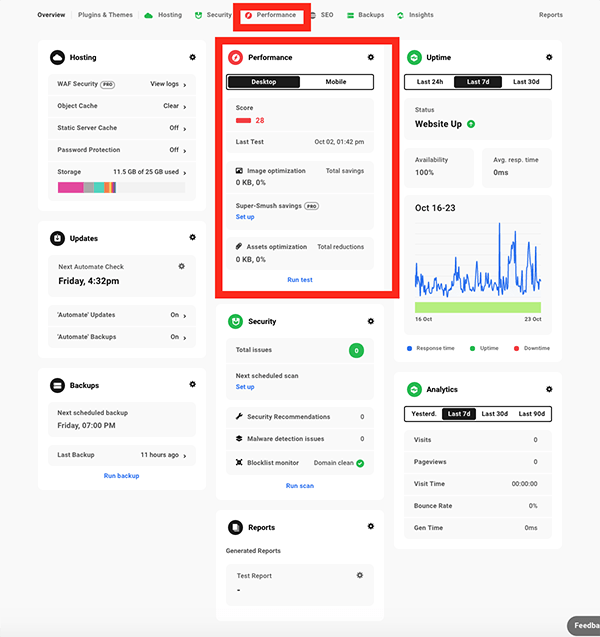
When you’re in the Performance area, you’ll see all that you’re able to do regarding speed.
The Performance area is where you can run a speed performance test and see your score.
Check your score based on desktop and mobile. It will also allow you to schedule speed performance tests and view when the last one was.
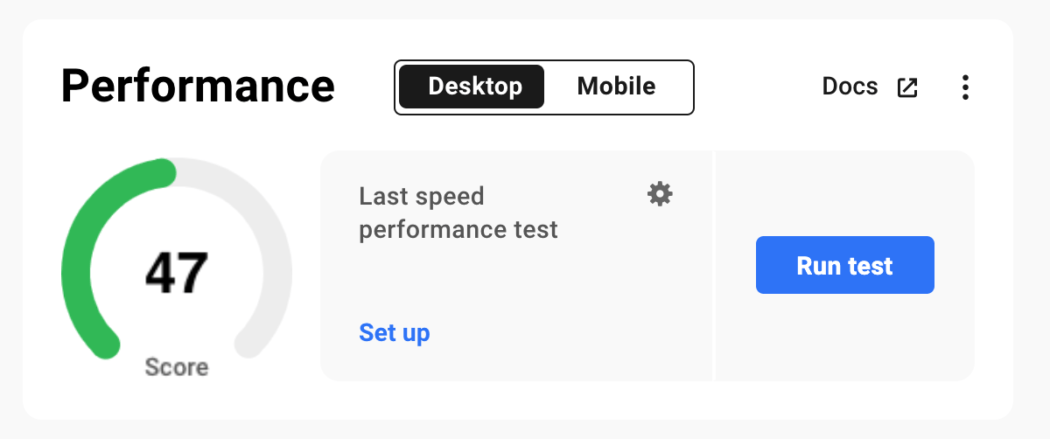
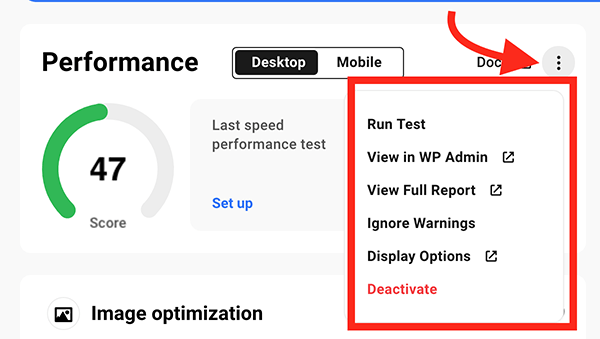
By clicking on the ellipsis, you can view even more options, including:
- Run Test
- View in WP Admin
- View Full Report
- Ignore Warnings
- Display Options
An option to Deactivate the performance feature is also done from here.
There’s a ton you can accomplish to tweak your score for optimal performance. Be sure to read our documentation for more details.
With the Response Time section, you can monitor your server response time. It will let you know when your website is down or too slow for your visitors. You can adjust the timeline to the last 24 hours, the previous seven days, or the last 30 days.

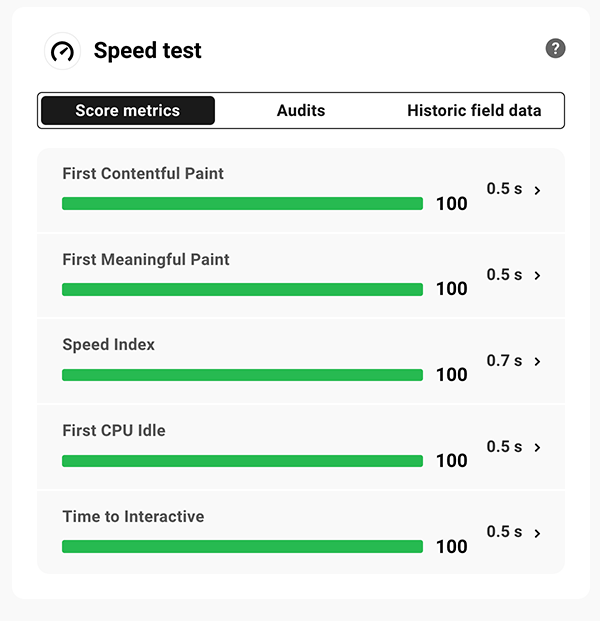
With the Speed Test, you can run a Google page speed test and get itemized insights — with fixes on how to improve your site’s performance.
The Score Metrics is based on:
- First Contentful Paint
- First Meaningful Paint
- Speed Index
- First CPU Idle
- Time to Interactive
To learn more about what the above score metrics mean, see these tutorials:
- How to Improve First Contentful and Meaningful Paint
- How to Improve Google Pagespeed User Interaction Metrics in WordPress
When clicking each metric, it will open up a new tab in Hummingbird, where you can view recommendations on how to fix it.
The Audits tab will show you the results of a performance test, opportunities to fix performance, diagnostics, and passed audits.
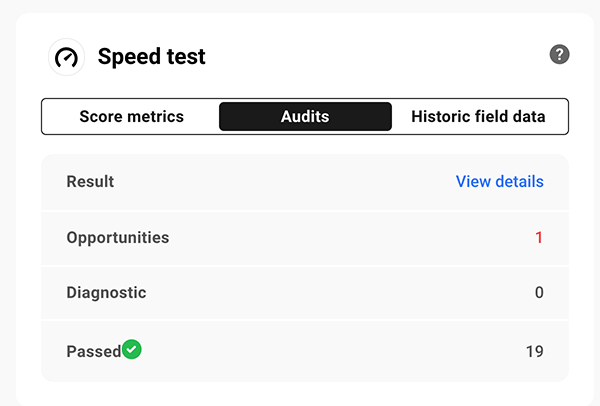
Finally, in the speed test section, the Historic Field Data tab will show you historical data when you have a well-established website.
You’ll be able to keep your site running at top-speed with all of the information provided in The Hub and by improving performance issues when necessary.
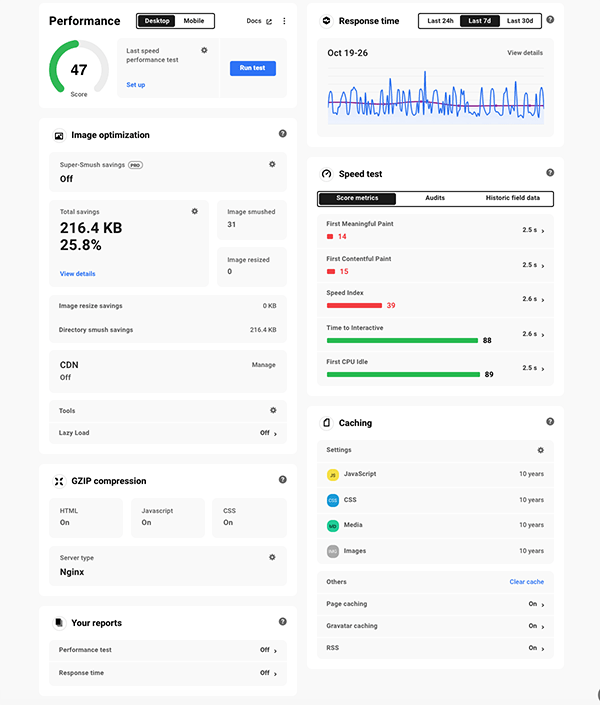
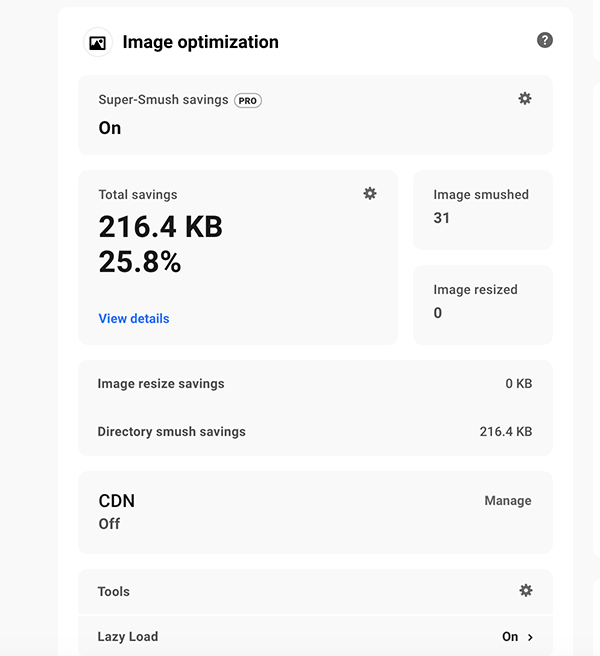
Moving on to the Image Optimization area, you can view if you have Smush on or off under Super-Smush savings. Plus, it shows you the total savings (in KBs), images smushed, and images resized.
Also, manage the Smush CDN, turn on Lazy Load, and access additional tools (e.g. resize detection).
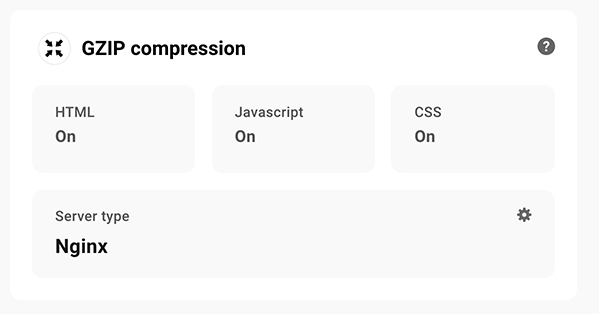
With GZIP Compression, you can compress your webpages and stylesheets before sending them to your visitor’s browser, which drastically reduces travel time.
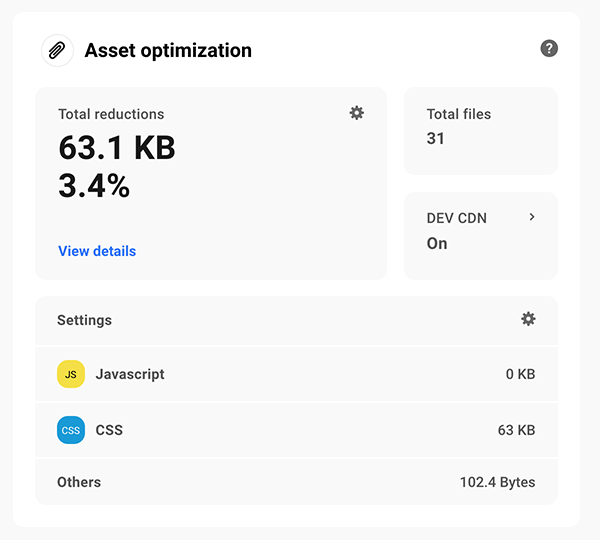
Asset Optimization will optimize your assets by compressing and organizing them in a way that improves page load times. There are automated options, or you can configure each file yourself.
This area shows you the total reductions, total files, whether WPMU DEV CDN is on or off, and allows quick access to additional settings. Plus, it will show you what files you have set up to optimize automatically (e.g. Javascript & CSS).
Caching stores files temporarily on your visitors’ website so that they don’t have to download assets twice. You can manage caching from The Hub and Hummingbird by changing the recommended expiry, changing your server type, and checking the status.
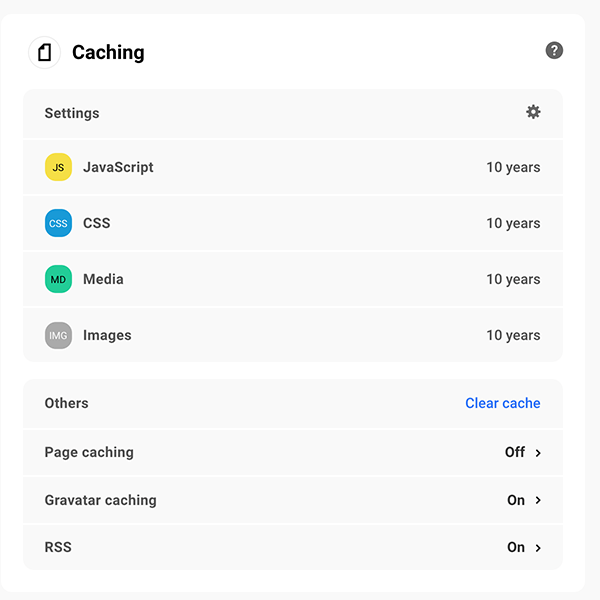
There’s also the option to turn on or off Page Caching, Gravatar Caching, and RSS. Also, you can Clear Cache by choosing what caches you want to clear.
Clicking ‘Clear Cache’ is all you need to do once you have your selected options.
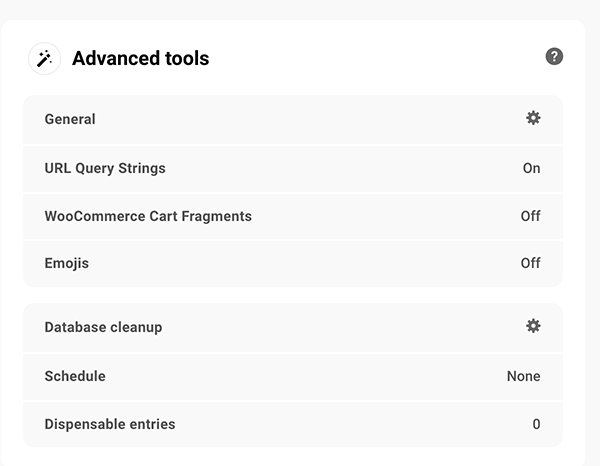
The Advanced Tools allows you to turn on or off URL Query Strings, WooCommerce Cart Fragments, and Emojis to boost your performance.
Also schedule a database cleanup and view dispensable entries.
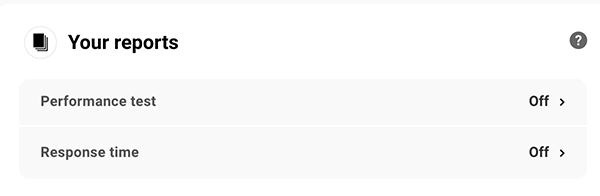
With Your Reports, you can create customized reports that get sent directly to your inbox.
4. View Your Site’s Insights (in detail)
To view the detailed information in The Hub, clicking on View Details gives you a better look at the monitoring activities. You can also get to these details by clicking the Insights tab.

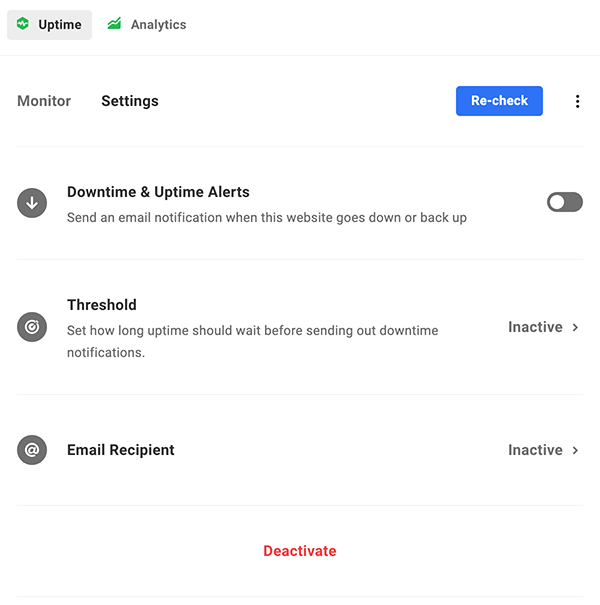
From here, you can view Uptime, Downtime, Response Time, and Alert-Info.
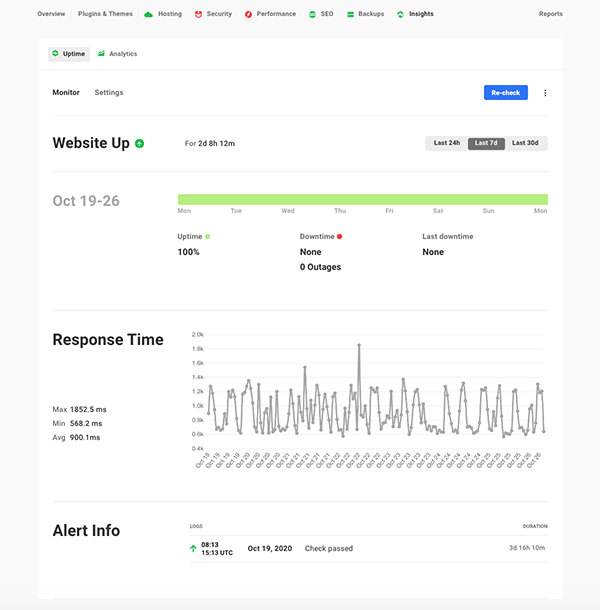
Plus, you can re-check the information, adjust the threshold, and get email notifications in the Settings area.
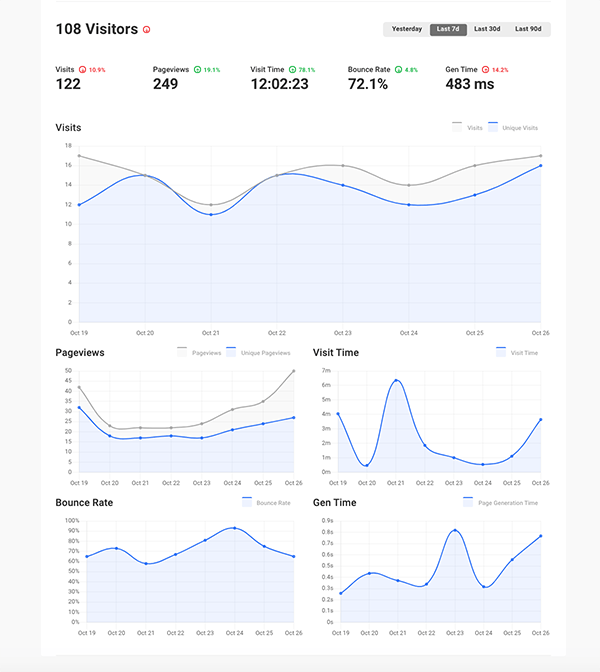
In the Response Time area, you can also view your traffic information from the Analytics tab.
The analytics also includes pageviews, visit times, bounce rates, and gen time.
It’s important to know that your website is up-and-running. The performance area of The Hub will let you know with constant monitoring, email notifications, and alerts.
This is just the tip of the iceberg of what you can do when maximizing your site for peak performance. For much more detailed information, be sure to read our article, Optimizing Your WordPress Site Performance with Smush, Hummingbird, and The Hub.
5. Easily Manage Your SEO
SmartCrawl and The Hub make managing WordPress SEO easy. You can optimize your website or network for more traffic and improve your search engine results.
Get to your site’s content analysis’, conduct automated SEO reports, scans, and more from the SEO area in The Hub Overview or the SEO tab.
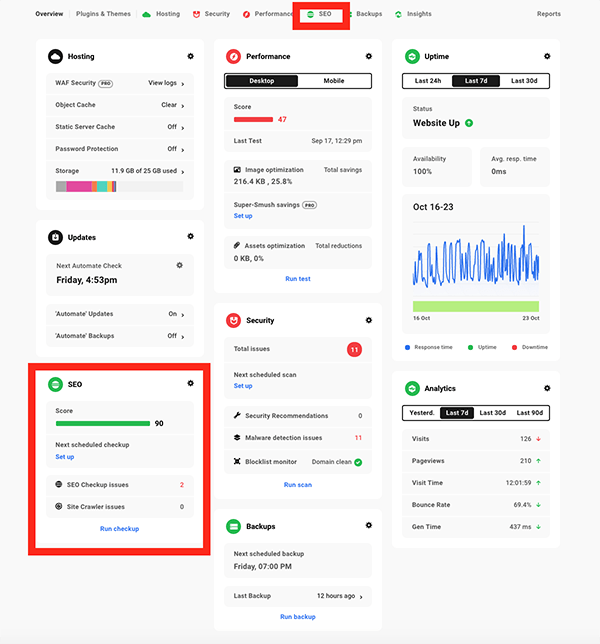
The SEO opens up everything you’ll need to rank higher in the SERPs.
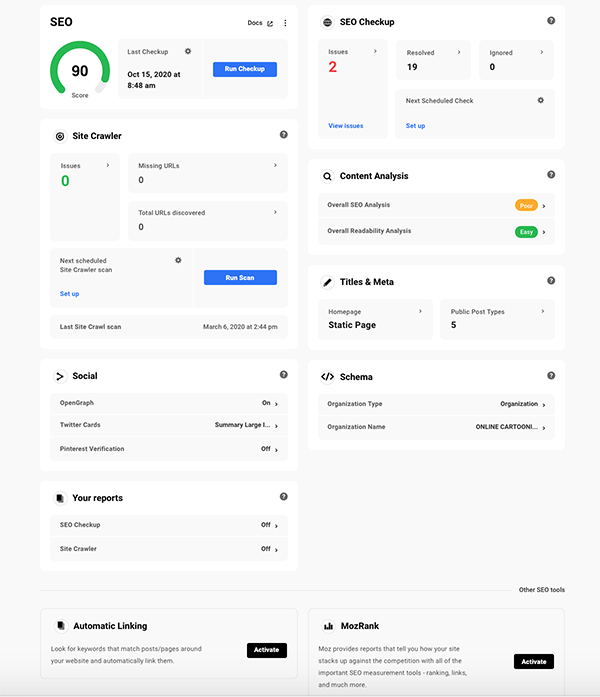
You can see your current SEO score from the SEO area, know when the last checkup was, and run a checkup with a button click.
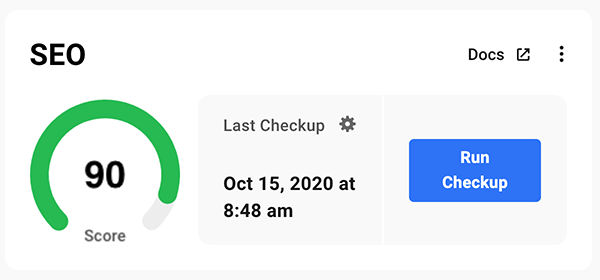
SEO Checkup area is designed to quickly and efficiently take care of SEO issues to help optimize your website for search engines and social media.
This area enables you to view your issues and take care of them in just a few clicks. Plus, you can see your resolved & ignored issues and schedule a regular SEO checkup that will send reports directly to your inbox.
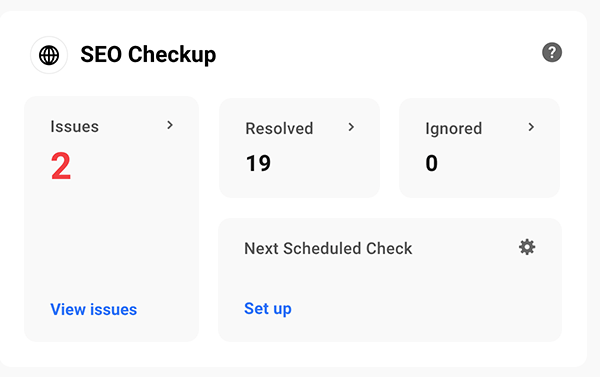
The Content Analysis is where you can view your overall SEO analysis and overall readability analysis. It will give you recommendations on how to rank highly and ensure your site is easy for the average person to read.
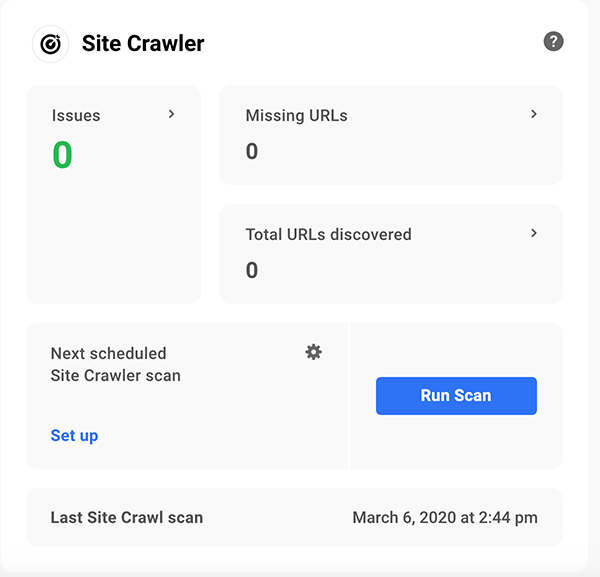
From the Site Crawler area, you can run a scan to detect URL issues. That goes for broken URLs, 404s, multiple redirections, and absent URLs. All of these factors can disrupt rankings in search engines.
From here, you can run or schedule a scan. Also, it will display the number of issues, missing URLs, and total URLs discovered. Lastly, you can see when your last site crawler to scan was conducted.
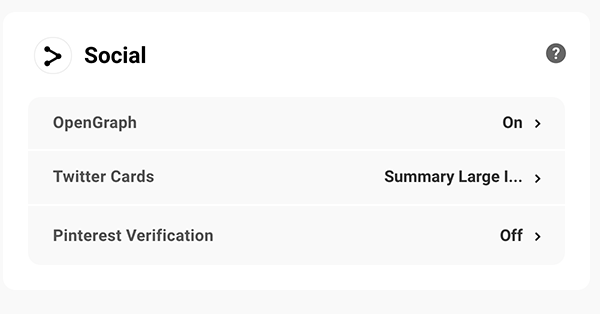
In the Social area, control and optimize how your WordPress site will appear on social networks, such as Facebook and Twitter.
This is done by enabling OpenGraph, Twitter Cards, and for Pinterest, you can add verification so that it attributes your website when content from it is pinned to the platform.
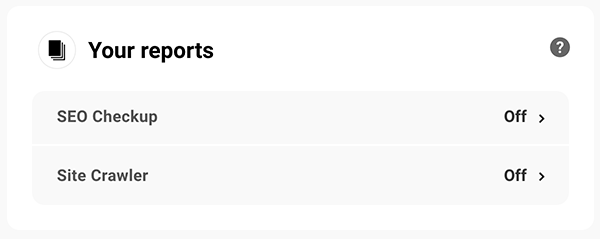
To get SEO checkup and Site Crawler reports delivered right to your inbox, you can enable this from the Your Reports area.
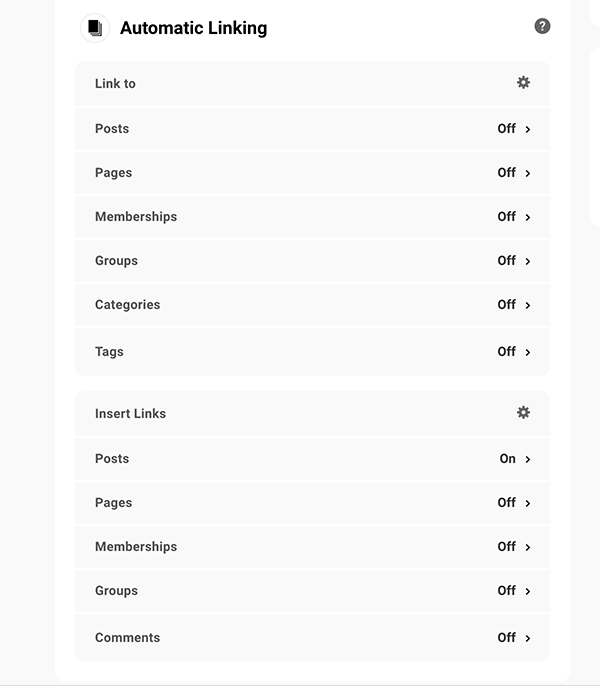
With Automatic Linking, you can set it up to automatically look for keywords that match posts and pages and then link them to your website.
You can even add custom links and exclusions!
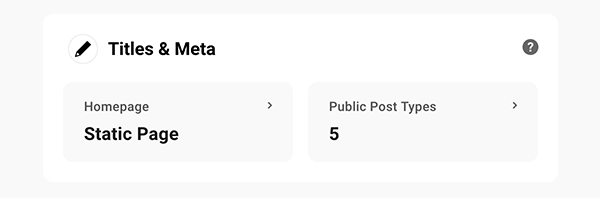
With the Titles & Meta area, you control how your WordPress site’s pages, posts, and custom post types appear in search engines.
When clicked, you’ll also get recommendations about wordcount and what to include in your descriptions.
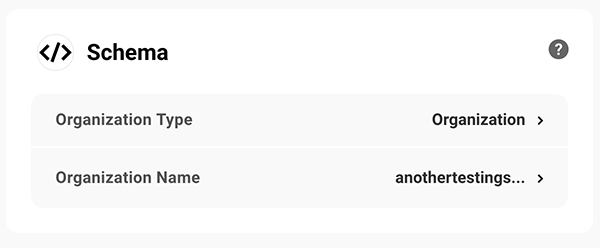
Let search engines know whether you’re an organization or a person with Schema. With Schema, you can also add all of your social profiles, so search engines understand what social profiles to attribute your web content.
Also, connect with Moz to get even more detailed SEO reporting for your site. You’ll need to create an account, then once activated, it will be an accessible section for you in The Hub.
To get even more details on using SEO with The Hub, read our article, Easily Configure Your WordPress SEO with SmartCrawl and The Hub.
6. Customize White Label Reports
Create comprehensive white label activity and performance reports for you and your clients from the Reports tab and Reports area in The Hub overview.
It works by pulling data from your active plugins & services. It then creates reports that cover Updates, Security, Performance, Backups, SEO, Uptime, and Analytics. Then, it will deliver these reports directly to your inbox.
It’s easy to get started. Click on the Reports tab, and it’ll give you the option to Create Report.
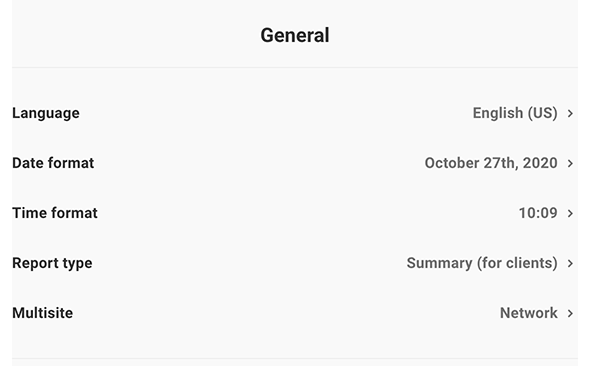
You give the new report a name, and then you can start to configure it with the options for:
- Language: Choose between 20+ languages from the dropdown.
- Date Format: There are four formats to pick from, or you can create a custom one.
- Time Format: Like the date format, you can customize the time format or choose between three options.
- Report Type: This allows you to gauge the report’s information, based on who will be reading it: Summary (for clients) or Detailed (for developers).
- Multisite: If you’re creating a multisite report, this option is used to create one for the whole network.
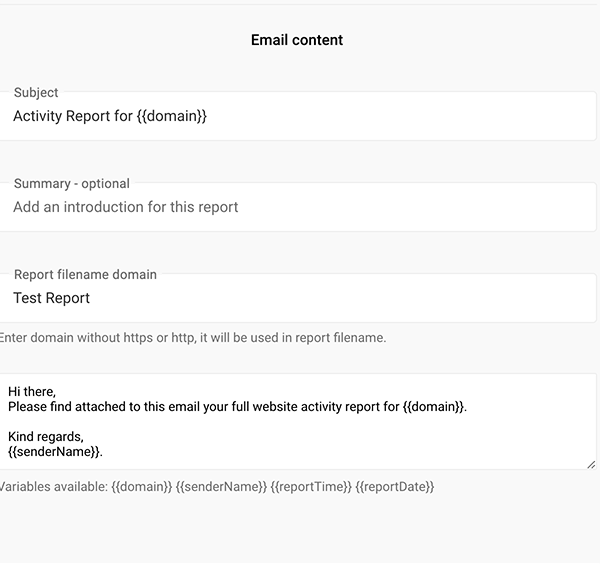
Then edit your email structure in the Email Content area with customization in these fields:
- Subject: What the email subject is.
- Summary (optional): You can include a short introduction to the report.
- Report filename domain: This is the filename for the report.
- Main content: What’s included in the body of the email.
It’s probably a good time to mention that you can see a preview of what the report is looking like at any time as you go through creating a report. Just click the Preview button.
Make sure your report is looking good with a preview.
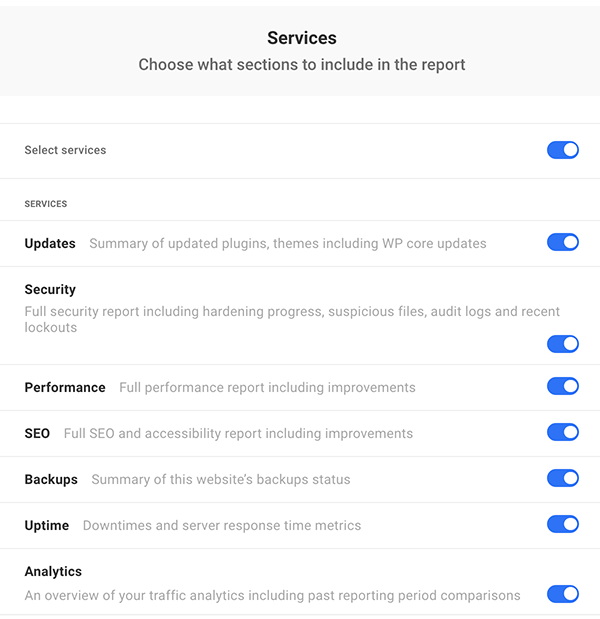
Going forward with the report, you’re able to add specific services in one-click to the report in the Services area. You can choose to include:
- Updates
- Security
- Performance
- SEO
- Backups
- Uptime
- Analytics
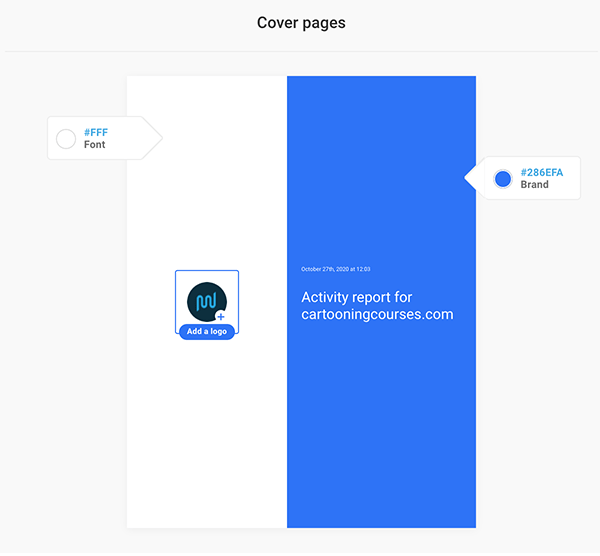
From this point, you can customize your cover page. Add your logo, colors, and font color. Simply click on the labeled areas to do so.
The Generate area is for the email sender details. You can control and edit:
- Sender name
- Reply-to
- Schedule
- Recipients
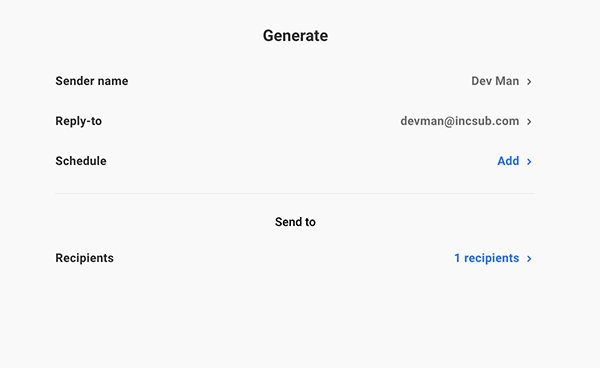
If you don’t schedule a report, it’s sent out immediately once you have it completed.
When a report’s sent out, your recipients will receive a totally white labeled PDF report with all of the specific information you wanted to include, delivered right to their inbox.
A clean report that has it all!
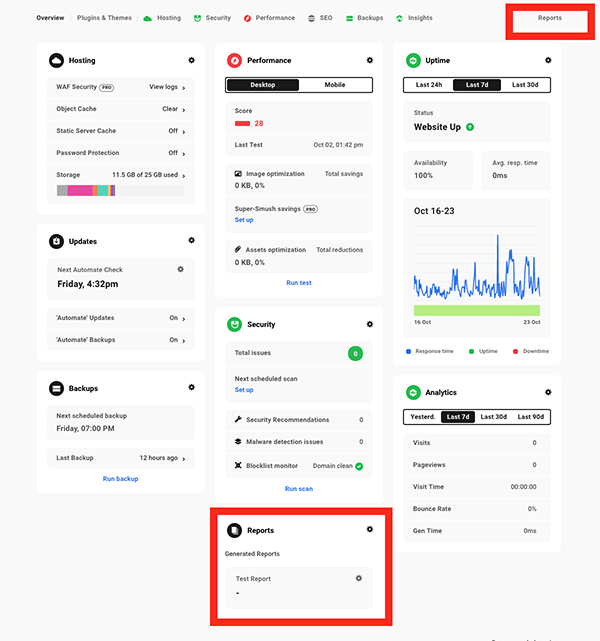
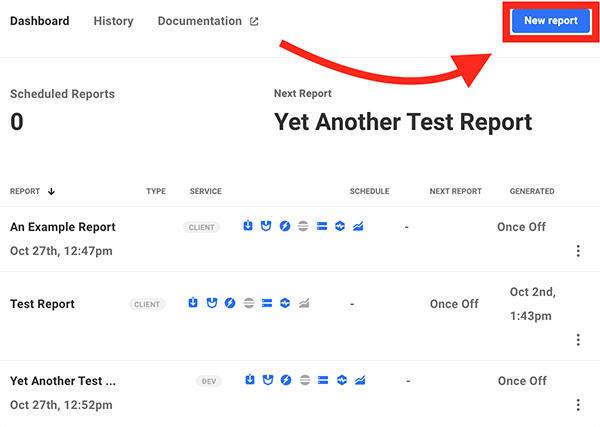
Manage Reports in the Dashboard
From the Reports Dashboard, you can gain quick access to reports, create a new report, modify existing reports, see when the next report is scheduled, and more.
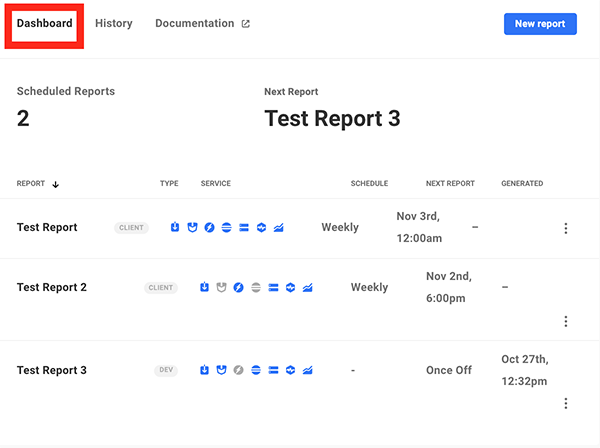
Each report has the details for it, including the report’s name, type of report (Client or Dev), services included in the report (e.g. SEO, analytics, etc.), frequency schedule, when the next report is, and when it was created.
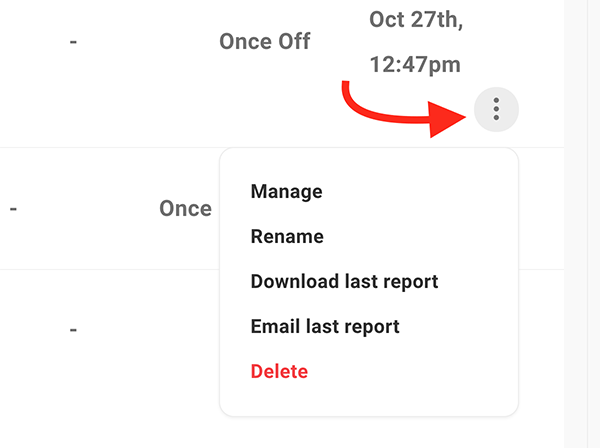
When you click on the ellipsis on a report, you’ll get options to manage, rename, download the last report, email the last report, and to delete it.
Create a new report from the New Report button.
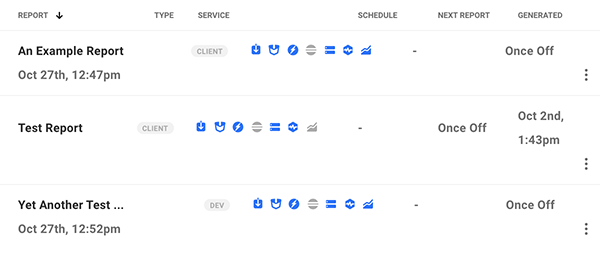
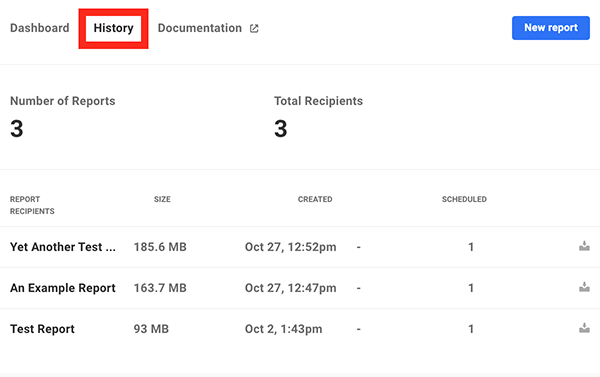
Also, you have quick access to reports from the History tab. From here, you can download reports, see when they’re scheduled, view the number of recipients, and get the size of the report.
White label reporting is quick and easy, thanks to The Hub. You can keep yourself, and your clients, in the know of all of your vital website information.
For more information on detailed white labeled reports, click here.
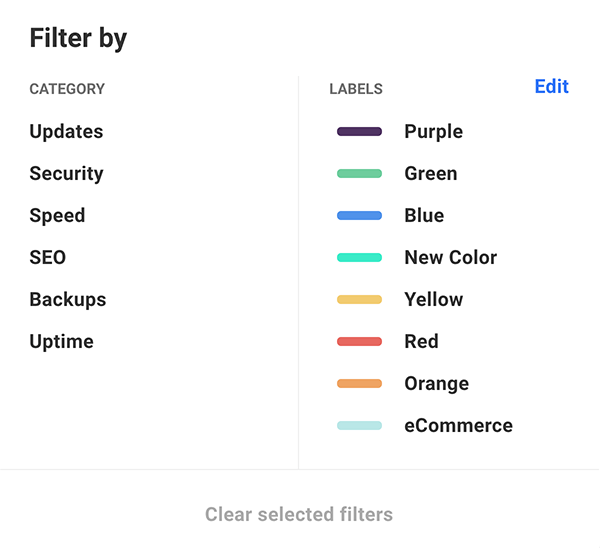
7. Create Filters and Labels
With The Hub’s Filters & Labels, you can selectively order groups of your WordPress sites based on a few standard categories and labels. This makes organizing and accessing your websites is simple and effortless.
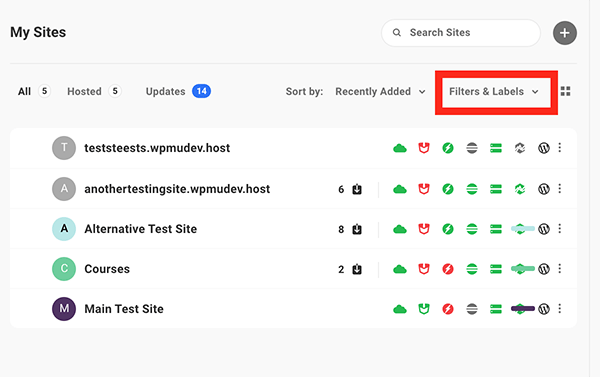
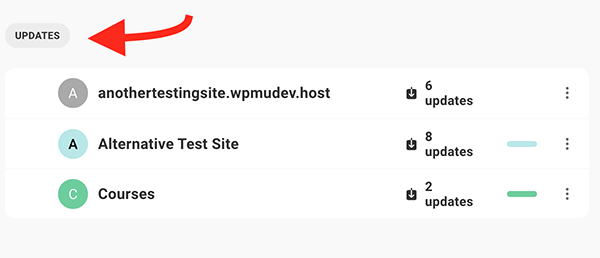
You can filter by:
- Updates
- Security
- Speed
- SEO
- Backups
- Uptime
Once you select a filter, it will pull-up all the sites with that feature and organize them according to what you chose.
Also, you can label sites by any color you choose. Plus, create a new label (e.g. eCommerce) for a specific site to help you organize your sites better.
With Filters & Labels, gaining access to your site is now quick and in your control. To find out much more detailed information, be sure to read our article, More Labels & Languages — The Hub Just Gets Better.
8. Make Advanced White Labels
With our white labels, you can replace our documentation, links, and (gulp!) even our superheroes with your branding.
The White Label tab is where you can get started.
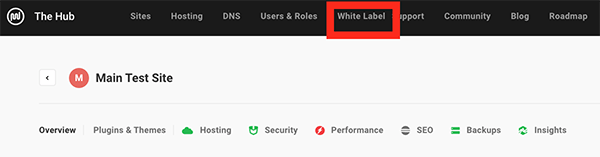
From there, you’ll see about white labeling our plugins and also white labeling The Hub. This will lead you to download our plugins: WPMU DEV dashboard plugin (which should be installed already if you’re a member) and The Hub Client plugin.
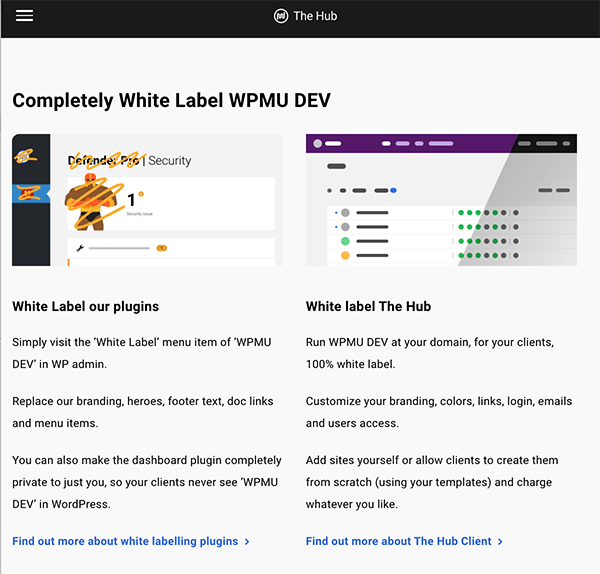
When it comes to white labeling in your WordPress admin, simply go to the WPMU DEV dashboard on your WordPress site. From there, you’ll see a section called Whitelabel.
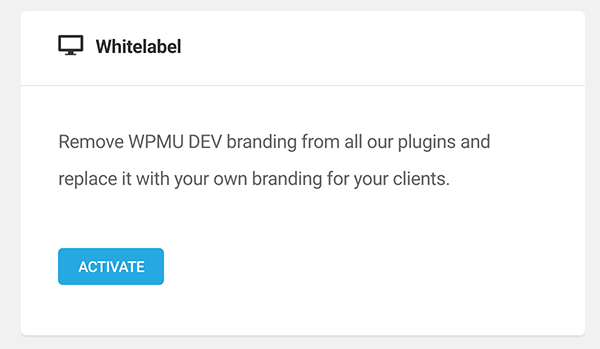
Now, you can white label the branding, footer text, admin menu labels (with the help of our white label plugin, Branda Pro), and remove our documentation, tutorials & products.
Our superheroes will be okay with it if you don’t want them here.
With The Hub Client, you can completely white label the Hub and client’s dashboard, so The Hub becomes YOUR Hub customized to your brand.
Once the plugin is downloaded, all white labeling can be done on the Hub Client dashboard. From this spot, you can change the settings to suit your preference. That includes:
- Adding your brand name
- Replacing the WPMU DEV logo with your own
- Choosing a color scheme for the navigation background, navigation text, and navigation test selected & hover
- Configuring the navigation
- Setting up the client page
- Managing users & roles
- Including terms of service URL
- Adding a privacy policies URL
White label as much or as little as you’d like.
Practically everything can be white labeled for you and your clients.
For more on The Hub Client, be sure to read our detailed article, How to Simply Set Up Users & Roles for You and Your Clients.
And for more on Branda and her awesome white labeling capabilities, read our article about getting the most out of using Branda.
9. Access and Take Control of Backups
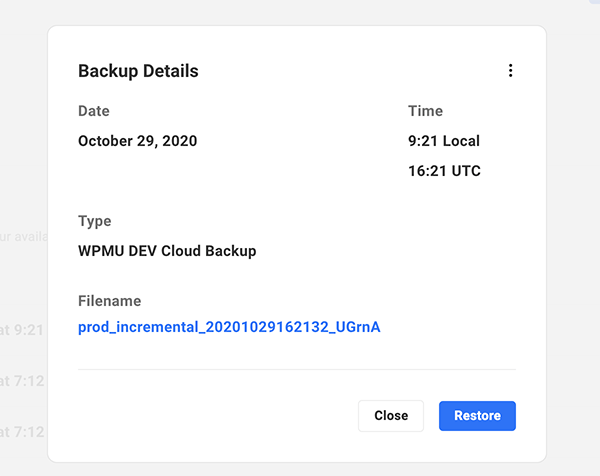
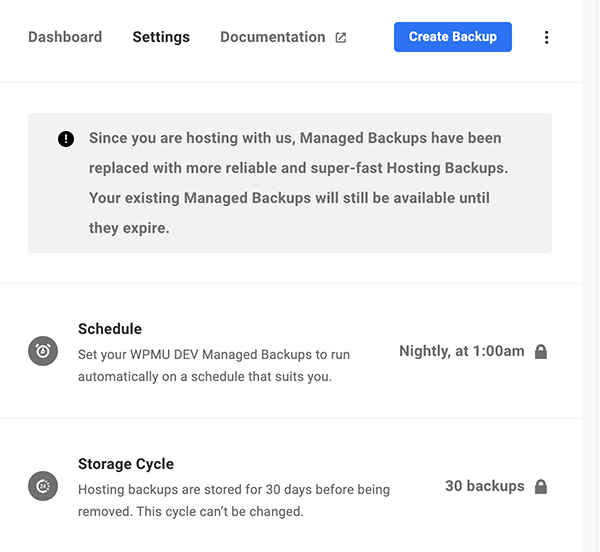
From the Backups tab, you can view the dates & time of backups, get details on each backup, download the backup file, create a backup, and view the backup schedule for your WordPress site.
View all of the updates and the dates when each update occurred.
When you click on individual backups, you can get detailed information. You can also restore the backup with the Restore button. If you click on the ellipsis, it will download the report.
From the Settings tab, create a backup and get information about your backup schedule and storage cycle.
Ensuring that your site is backed up is essential. You can sleep well, knowing that your site is in good shape with automatic backups and the detailed information that comes with them.
For more on backups and The Hub, you can find out more here.
And That’s Not All…
This article features a lot to get the most out of The Hub — but it doesn’t end there! The Hub has a ton of additional features, including managed hosting, 24/7 live expert support, exclusive members community, and much more.
We’re continuously working to improve The Hub. Everything from new tabs to labels & languages, The Hub just keeps getting better. Thanks to our team of developers, the best is yet to come.
Be sure to keep tabs on what’s next with The Hub with our Roadmap.
For centralized and effective WordPress site management, there’s no sub for The Hub. Be sure to get the most out of it today.