How to Add Email Subscriptions to Your WordPress Blog
Do you want to make it easy for readers to subscribe to your WordPress blog?
Many businesses miss out on the benefits of having a direct connection with their audience through email. By having people subscribe to your email list, you can increase traffic, make more sales, and build a relationship with your audience.
In this article, we’ll show you how to add email subscriptions to your WordPress blog and start building your email list.
Why Should You Add Subscribe via Email Option to Your Site?
While social media is one way to connect with your audience, email is still the most reliable form of communication.
It gives you a direct connection to your readers because you can email subscribers whenever you want. Plus, you have control over email, whereas you have very little control over social media platforms.
For instance, you could post on Facebook or Instagram to thousands of followers, but only a portion of them may see your content due to algorithms that determine your reach.
For more on this topic, see our article on why you should start building your email list (right away).
You might think it’s difficult to add an email subscription option to your website, but it’s not.
With all of the email marketing software available today, it’s become quite easy, and you can get started in just a few clicks.
Since there are dozens of email software to choose from, we’re going to share with you a few solutions we believe work best.
How to Add Email Subscription to Your WordPress Site
First, you’re going to need an email marketing service.
We recommend using Constant Contact because it is the most beginner friendly email marketing service for small businesses.
It comes with built-in tools to see your email performance, such as email opens and click rates. These tools can help you make decisions over time that improve your email campaigns and grow your business.
Their Email Plus option comes with features such as:
- Automations
- Surveys
- Polls
- Coupons
- Online donations
- A/B subject line testing
Constant Contact also works well with other tools like WordPress form plugins, so you can use it to grow your business. You’ll see a few of them, and how they can be used later in this article.
Some alternatives to Constant Contact are SendinBlue, ConvertKit, and MailerLite. All work similarly and have slightly different features.
For now, we’ll show you how to add an email subscription option in WordPress using Constant Contact. You can still follow along even if you’re using another email service as they all share similar concepts.
Creating Your Email Subscription List
The first thing you need to do is sign up for Constant Contact. Simply go to their home page, click on ‘sign up for free’, and fill out your information.
Once you’ve created your account, it’s time to set up your email list.
An email list is simply the list of email addresses that your users will provide when they sign up for your email subscription.
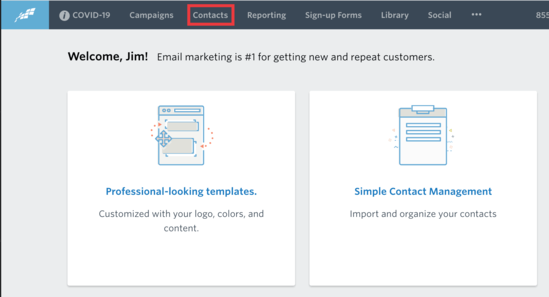
First, you need to click on the ‘Contacts’ button at the top of your Constant Contact dashboard.
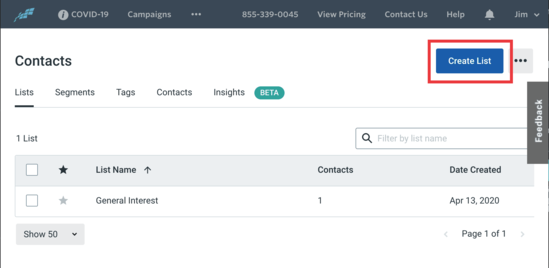
This will take you to the contacts page. From there, you need to click on the blue ‘Create List’ button.
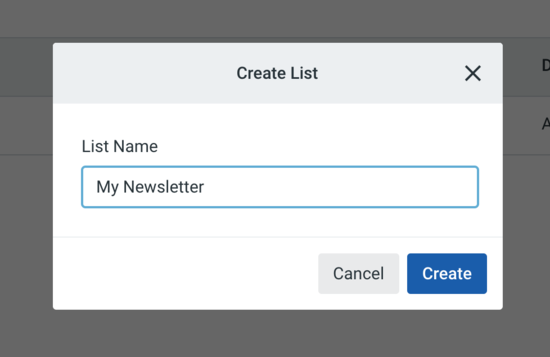
You’ll be asked to provide a name for your email list. It can be whatever you want, but we’ll call it ‘My Newsletter’ for this example.
And that’s it. Now you have a new list people can subscribe to.
The next step is to add an email subscription form to your WordPress website where your website visitors can sign up.
Adding Email Subscription Form in WordPress
Constant Contact comes with an email signup form builder, but the easiest way to get started is by using the WPForms plugin. It integrates seamlessly with Constant Contact to set up an optin form easily.
WPForms also has a limited free version called WPForms Lite. It also allows you to connect your forms to Constant Contact.
First, you need to install and activate the WPForms plugin. If you need help, then follow our guide on how to install a plugin for detailed instructions.
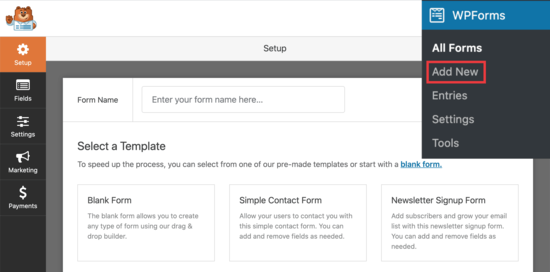
Upon activation, you need to visit WPForms » Add New page and then select the ‘Newsletter Signup Form’ template.
On the next page, you’ll get a prompt to set up your email marketing service in the marketing tab. We’ll get to that in a moment.
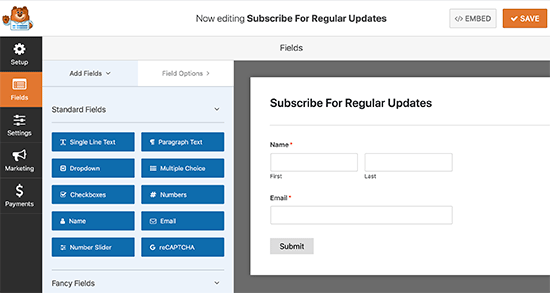
WPForms will now load a sample newsletter sign up with the form builder interface. It will include first and last name and email address fields to the form.
You can change the form fields if you want. For instance, you can add a full name and email address field. You can click on a form field to change its title or move them up and down.
Once you are satisfied with the signup form, click on the big orange ‘SAVE’ button at the top.
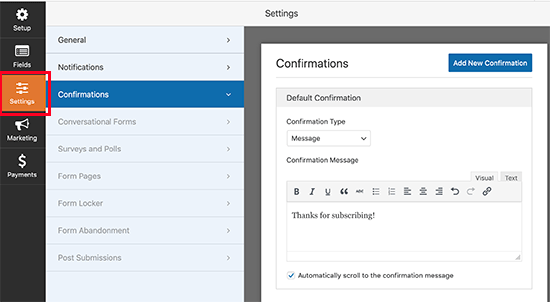
Now, it’s time to set up your confirmation message. This is what your users will see when they submit the form.
Simply, switch to the ‘Settings’ tab and then click on the ‘Confirmation’ section.
By default, WPForms will show a confirmation message which you can change to anything you want. You can also change the confirmation type and redirect users to any page or URL.
Now that your newsletter sign up form is ready. Let’s connect it to Constant Contact.
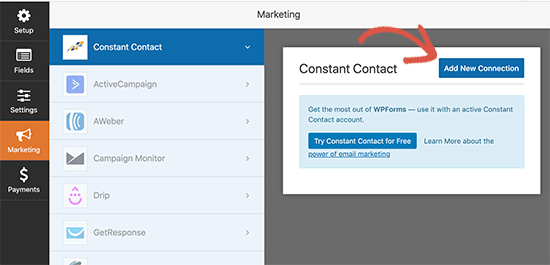
Simply click on the ‘Marketing’ tab and select ‘Constant Contact’.
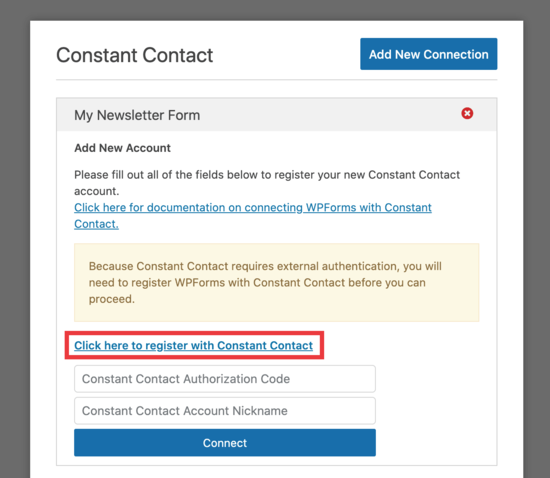
Next, click on the ‘Add New Connection’ button and you’ll see a popup that asks you to name your connection. We called ours ‘My Newsletter Form’ but you can name it whatever you want.
After that, click on the ‘Click here to register with Constant Contact’ link.
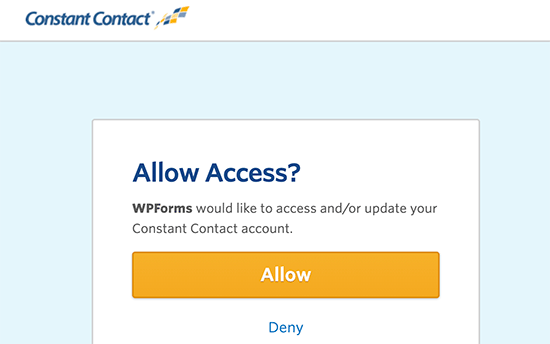
It will open a popup where you will be asked to allow WPForms to connect with your Constant Contact account.
Click on the ‘Allow’ button to continue.
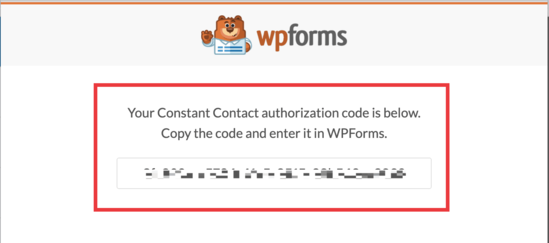
You’ll be given a long authorization code to register your form.
Copy and paste the authorization code in WPForms settings and provide an account nickname. The ‘Account nickname’ could be anything you want.
Finally, click on the connect button to continue.
On the next screen, you’ll be able to select the fields you want to pass through from your form to Constant Contact.
We selected ‘email’ and ‘full name’ but you can select as many as you want. Just be sure that those two fields are included in your newsletter sign up form fields.
Click the big orange ‘Save’ button when you’re done.
Now that we have the form set up, we want to place it on our WordPress website. For this example, we’re going to place it in our sidebar. But the form can go on any page you want.
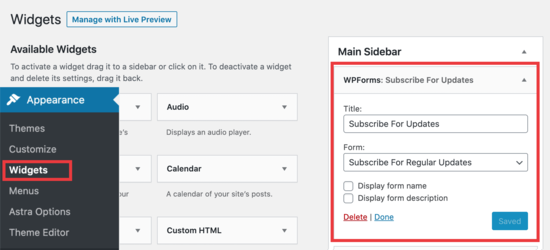
Go to Appearance » Widgets page and add the WPForm widget to your sidebar.
Provide a title for your widget and then select your newsletter sign up form. Don’t forget to click on the save button to store your widget settings.
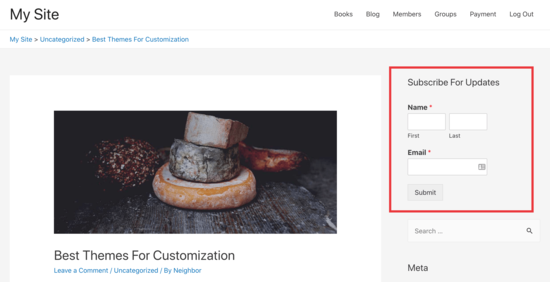
You can now visit your website to see your email subscription form in action.
You now have an email subscription box in your sidebar. And whenever someone fills out their name and email, they get subscribed to your newsletter.
Now that everything is set up, let’s take a look at how to send emails to your subscribers.
How to Write and Send Emails to Your Blog Subscribers
There are a few ways people can get your updates, and that’s through regular emails or an RSS feed.
The RSS feed method automatically sends users an email whenever you publish a new blog post. However, it is less effective, has very low open rates, and users get annoyed when they receive too many emails.
We recommend writing your emails manually. This allows you to make your emails more personalized and conversational, add any content you want, and choose your own frequency.
Most popular bloggers send an email newsletter once a week. You can set your own frequency and schedule the emails ahead of time, so that your users get them on the same day and time every week.
We’ll now walk you through writing your first email and sending it to your subscribers.
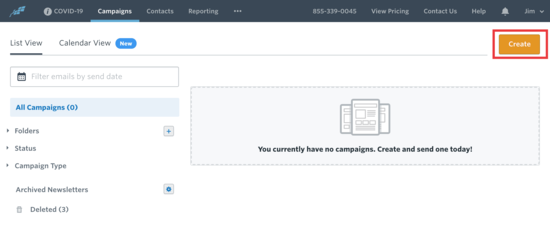
First, go to the ‘Campaigns’ page in your Constant Contact account dashboard and then click the ‘Create’ button.
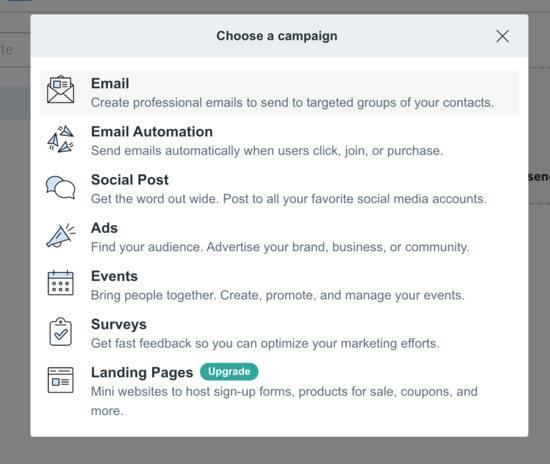
You’ll then select ‘Email’ under ‘Choose a campaign.’
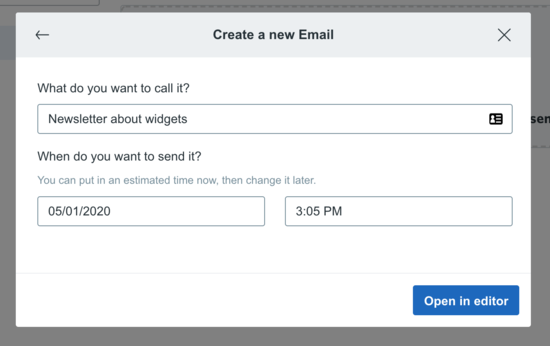
Next, you’ll need to name your newsletter. This is for organization and you can change it later if you want.
After you click on ‘Open in editor,’ you’ll see the option to choose a template. We’ve chosen the Basic Newsletter template for this example, but you can pick anything you want.
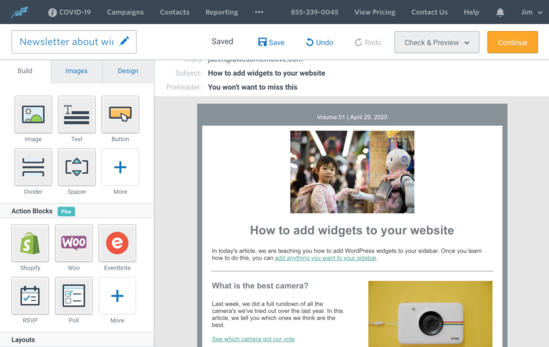
On the next page, you’ll be able to edit, add to, or remove any of the elements you see. Here’s what ours looks like as an example:
At the top, you’ll see the subject and preheader. To change this, you just click that area and add whatever you want.
On the left side, you’ll see a handful of options you can drag directly into your newsletter template. You can add text, buttons, images, and more.
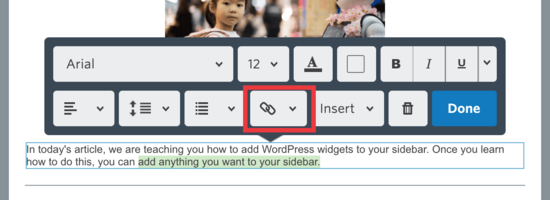
In this example, we added a few photos, some text, and some links. To add a link to your newsletter, you can highlight any text you want.
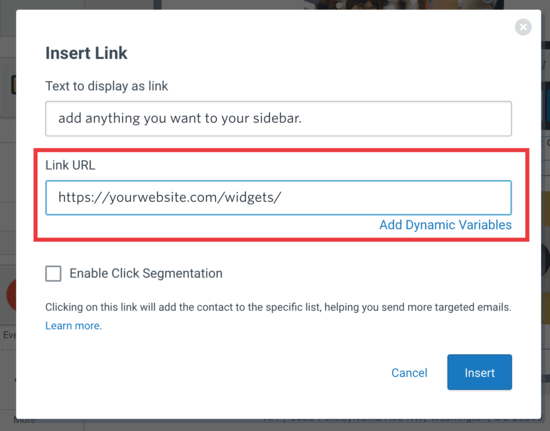
Click the chain link icon, and then paste the link to your blog post, like this:
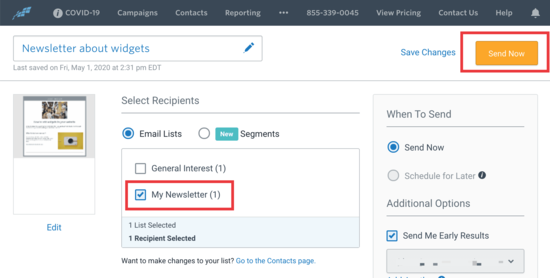
Click ‘Insert’ and you’re ready to go. Now, for the last step, click ‘Continue’ in the upper right corner and you’ll see the following:
Make sure you check the box next to your list (My Newsletter), and then hit the ‘Send Now’ button at the top.
And that’s how you send your very first email manually. Also, if you want to schedule it for later, you can choose that option and set a date for it to send.
You can repeat this process at any time you want to notify your subscribers about anything new on your blog.
How to Get More Email Subscribers
Did you know that more than 70% people visiting your website will simply never see it again? This why you have added an email subscription option to your blog so that you can notify users about new content, offers, and services.
However, adding just one sign up form in your sidebar is not enough. You’ll need to find more ways to quickly get more email subscribers.
This is where OptinMonster comes in. It is the best conversion optimization software in the world and helps you convert more website visitors into subscribers.
Instead of embedding a form in your sidebar that probably won’t get noticed, you can create opt-in forms that convert well and have been tested on thousands of sites.
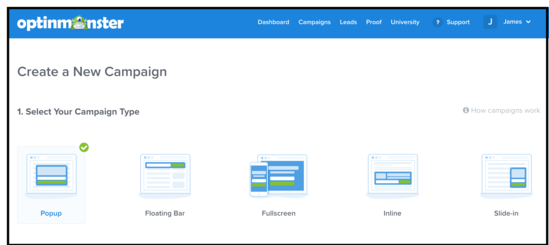
With OptinMonster, You’ll get floating header and footer bars, slide-in boxes, welcome mats, inline forms, and lightbox popups.
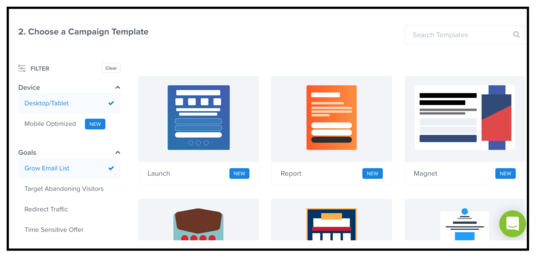
Next, you need to choose a campaign template that you can further customize to your liking:
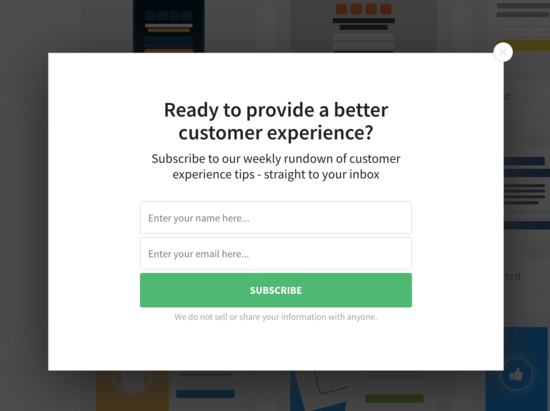
For instance, you can set up a popup on your site that triggers when someone is about to hit the back button in their browser. This is known as an exit-intent popup.
So right before someone leaves your site, they get a chance to subscribe, and many do because this has been tested on thousands of sites.
What’s great is OptinMonster integrates perfectly with any email marketing software and all types of websites. For more tips check out these tested and easy ways to grow your email list faster.
We hope this article shows you how to add email subscriptions to your WordPress blog. You may also want to read our guide on how to get a free business email address for your blog, and how to get a free virtual business phone number for your blog.
If you liked this article, then please subscribe to our YouTube Channel for WordPress video tutorials. You can also find us on Twitter and Facebook.
The post How to Add Email Subscriptions to Your WordPress Blog appeared first on WPBeginner.


